|
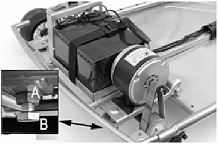
Belt Adjustment If the go kart makes loud or grinding noises or if the belt slips it is most likely the belt adjustment which is the problem. Belts that are too tight or that are too loose will cause these problems. When properly tensioned the belt should be flexible, but not too tight or too loose. Be careful not to tension the belt too tightly! The belt adjustment system on the Ground Force go kart can easily over tighten the belt and bend the motor's shaft or break the drive belt. When adjusting the belt rotate the adjustment bolt 1/8 turn at a time by hand and check the belt tension every adjustment for proper tension. When proper belt tension has been achieved, hold the adjustment bolt (see B) steady with a wrench and use another wrench to firmly tighten the locknut (see A). Then test drive the go kart, inspect the belt tension, and readjust the belt tension again if necessary. Improper belt alignment between the motor belt cog and the axle belt cog may cause noise and wear related problems also. If after adjusting the belt tension there are still noises or vibrations check for misalignment of the belt cogs. To adjust the belt alignment loosen the set screws on the axle's belt cog and adjust the cog from side to side until the belt alignment is correct and then retighten the setscrews. |
|
|
|
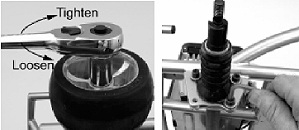
Belt Replacement Remove the motor cover and the seat. Loosen the belt tension adjustment bolt locknut and loosen the adjustment bolt. Remove the axle nut on the right hand side of the go kart (the side that the motor is on). Remove the axle guard by loosening and removing it's four Allen bolts. Then remove the wheel spacer tube and any shims or spacers. |
|
|
| Remove the brake
cover/guard. Then loosen the setscrew on the axle mounted brake
rotor until it slides free on the axle. Next loosen the axle mounted
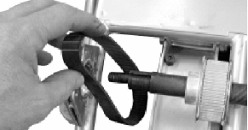
belt cog and slide the brake rotor towards the belt cog. Now the axle needs to be pushed through the bearing hanger on the frame to release the belt. Use a rubber hammer to gently tap on the end of the axle to help push it through the frame. Make sure the brake rotor and belt cog continue to slide along the axle as the tapping progresses and loosen the Allen bolts again if necessary so they are free to slide. When the end of the axle clears the bearing hanger the old belt can be removed and replaced with a new belt as pictured below. |
|
|
| To reassemble the
axle reverse the disassembly procedures and then adjust the belt
tension and alignment as described above. |